Here’s the file that went into /etc/udev/hwdb.d/61-keyboard-local.hwdb to effect this change both on the internal
keyboard and an external Apple wireless keyboard that I had lying around:
# Make the Samsung "Search" key act as left CONTROL modifier
evdev:input:b0011v0001p0001*
 KEYBOARD_KEY_db=key_leftctrl

# Same for the Apple bluetooth keyboard's CapsLock key
evdev:input:b0005v05ACp022C*
 KEYBOARD_KEY_70039=key_leftctrl
evtest was key to getting both the device identifier/selector strings and the key mapping directives worked out.
There’s baroque documentation at /usr/lib/udev/hwdb.d/60-keyboard.hwdb and /usr/lib/udev/hwdb.d/60-evdev.hwdb, but I didn’t get things right
following that as best as I could. This blog resource served me better.
Relevant bits quoted below for posterity:
15 Jun 2020, 00:05
This guide focuses on remapping keys using udev, which is the device manager for the linux. The advantages of this is that the rules are keyboard / device specific, so you avoid having to write your own keymap file and using it for every keyboard. HerbalNekoTea and I in the DT discord had some issues getting it to work correctly, so I wanted to write a step by step guide on how to do it.

Requires:

    linux based OS with systemd

    terminal knowledge

    the evtest program

I got the information on how to do key remapping from the following sources:

    https://wiki.archlinux.org/index.php/Ma ... o_keycodes

    https://wiki.archlinux.org/index.php/Ke ... _scancodes

    https://www.freedesktop.org/software/sy ... /hwdb.html

Also the files /usr/lib/udev/hwdb.d/60-keyboard.hwdb and /usr/include/linux/input-event-codes.h have a lot of useful info in them and come with nearly every OS.
I will be using arch linux but the links above should apply if you are on a different system. Most of what I will be doing here is as root (the sudo command) you can drop down into the root shell using sudo su -

The first step is to get the device "hardware match" string. The arch wiki had a really confusing way of doing this, so I came up with a more straight forward method. When I run the evtest command from the terminal, I get the following:

Code: Select all

# evtest
No device specified, trying to scan all of /dev/input/event*
Available devices:
/dev/input/event0:	Power Button
/dev/input/event1:	Power Button
/dev/input/event2:	SteelSeries SteelSeries Rival 110 Gaming Mouse
/dev/input/event3:	winkeyless.kr ps2avrGB
/dev/input/event4:	winkeyless.kr ps2avrGB System Control
/dev/input/event5:	winkeyless.kr ps2avrGB Consumer Control
/dev/input/event6:	PC Speaker
/dev/input/event7:	HDA NVidia HDMI/DP,pcm=3
/dev/input/event8:	HDA NVidia HDMI/DP,pcm=7
/dev/input/event9:	HDA NVidia HDMI/DP,pcm=8
/dev/input/event10:	HDA NVidia HDMI/DP,pcm=9
/dev/input/event11:	HDA NVidia HDMI/DP,pcm=10
/dev/input/event12:	HDA NVidia HDMI/DP,pcm=11
/dev/input/event13:	HDA NVidia HDMI/DP,pcm=12
/dev/input/event14:	HD-Audio Generic Front Mic
/dev/input/event15:	HD-Audio Generic Rear Mic
/dev/input/event16:	HD-Audio Generic Line
/dev/input/event17:	HD-Audio Generic Line Out
/dev/input/event18:	HD-Audio Generic Front Headphone
/dev/input/event19:	SINO WEALTH Gaming KB
/dev/input/event20:	SINO WEALTH Gaming KB  System Control
/dev/input/event21:	SINO WEALTH Gaming KB  Consumer Control
/dev/input/event22:	SINO WEALTH Gaming KB  Keyboard
Select the device event number [0-22]:

In this case I want to reassign some keys on my doomhammer (named "SINO WEALTH Gaming KB" in that list) so in this case I would then type 19 to start monitoring the events coming from that device. If you are unsure, select what you think is your keyboard, then start typing and see if the terminal outputting the keys you press. If you are getting no output its the wrong device.
Once you figure out what device you want to remap, you take the number that you used to monitor it (in my case 19) and type the following command to get the hardware match string for you keyboard

Code: Select all

cat /sys/class/input/event19/device/modalias

Take note on how the /sys/class/input/event19 matches to /dev/input/event19. The event19 in /dev/input is the actual device, the /sys/class/input/event19 is the folder for that device with the information you need. When I run the above command I get this:

Code: Select all

# cat /sys/class/input/event19/device/modalias
input:b0003v258Ap002Ae0111-e0,1,4,11,14,k71,72,73,74,75,79,7A,7B,7C,7D,7E,7F,80,81,82,83,84,85,86,87,88,89,8A,8C,8E,96,98,9E,9F,A1,A3,A4,A5,A6,AD,B0,B1,B2,B3,B4,B7,B8,B9,BA,BB,BC,BD,BE,BF,C0,C1,C2,F0,ram4,l0,1,2,3,4,sfw

Copy that output, then create a new file under /etc/udev/hwdb.d/ named 70-keyboard.hwdb and paste that output at the top of the file. The naming here is really important, because it did not work for me until I changed it to that filename. The hardware match here is pretty long, and can be longer, which isn't necessary to get your keys remapped. It can cause problems if its too specific, so I shortened mine to the following:

Code: Select all

input:b0003v258Ap002A*

The asterisk means that it will match any character after that part of the string, so essentially we are omitting that really long part at the end when we only need the values b0003, v258A, and p002A. To finish this part off we add evdev to the beginning of our string like so:

Code: Select all

evdev:input:b0003v258Ap002A*

Finally. we can now remap the keys. There's plenty of info up in the links I posted if you need the details but I am just going to post my configuration and a few rules of thumb when editing this file. udev is extremely picky, any syntax errors or anything a little off, it will refuse to set the rules you write in and just ignore them.

    indent the directives using a single space

    key reassignment syntax is KEYBOARD_KEY_<scancode>=<keycode> scancode comes from evtest, keycode is the name of a keycode as lowercase from the /usr/include/linux/input-event-codes.h file.

    /etc/udev/hwdb.d/70-keyboard.hwdb file ownership should be under user and group root and with -rw-r--r-- permissions. Double check using the ls -l command.

    removing a remap from the file will not remove the mapping for the key. You need to change the keycode back to what it was originally, then update, then you can remove the directive.

My file:

Code: Select all

evdev:input:b0003v258Ap002A*
#capslock -> left control
 KEYBOARD_KEY_70039=key_leftctrl
#pause -> numlock
 KEYBOARD_KEY_70048=key_numlock
#A -> B
 KEYBOARD_KEY_70004=key_b

The lines beginning with # are ignored by udev. I got the scancodes by running evtest and, for example, hitting the A key gives me the following output:

Code: Select all

Event: time 1592170729.749901, type 4 (EV_MSC), code 4 (MSC_SCAN), value 70004
Event: time 1592170729.749901, type 1 (EV_KEY), code 30 (KEY_A), value 1
Event: time 1592170729.749901, -------------- SYN_REPORT ------------
aEvent: time 1592170729.852908, type 4 (EV_MSC), code 4 (MSC_SCAN), value 70004
Event: time 1592170729.852908, type 1 (EV_KEY), code 30 (KEY_A), value 0
Event: time 1592170729.852908, -------------- SYN_REPORT ------------

As you can see, my scan code in this case is the part that says value 70004 after the code 4 (MSC_SCAN) part. You do this for every key that you want to remap. In my file I have already remapped the caps lock and pause keys and as you can see the scancode 70004 shows up in my file where I remap the A key to the B key. I recommend trying to remap one key first, see if it works, and then go from there so you don't write a big file of remapped keys and have it not work.
Once you have finished editing your file run the following command:

Code: Select all

systemd-hwdb update ; udevadm trigger --verbose --sysname-match='event19'

you can leave out the --verbose --sysname-match='event*' but that just confirms with an output which events were actually updated. To 100% confirm your remapping rules were actually added, run the following:

Code: Select all

 udevadm info /dev/input/by-path/*-usb-*-kbd | grep -i keyboard_key

From that output I get the following:

Code: Select all

# udevadm info /dev/input/by-path/*-usb-*-kbd | grep -i keyboard_key
E: KEYBOARD_KEY_70004=key_b
E: KEYBOARD_KEY_70039=key_leftctrl
E: KEYBOARD_KEY_70048=key_numlock

If I run switch hitter and press the capslock and pause key I get the left control and num lock keys respectively.
The machine is listed under Intel Skylake as “Samsung Chromebook Pro” as supported, HWID “CAROLINE”, but with a big red EOL in the RW_LEGACY Firmware column. WP_METHOD says “screw” and links to a picture of which screw grounds out the hardware write-protection system. (Do I remove this screw? Install it? I don’t yet know.)
The procedure under “Replacing ChromeOS via Full ROM firmware” involves putting the box in Developer Mode, disabling hardware firmware write protection, running their Firmware Utility Script, flashing the UEFI Full ROM Firmware they provide, rebooting and then installing Ubuntu (or I suppose some other OS). I will refer to that source page when actually doing these steps as some link to details.
]]>Then, on first boot, Ctrl-D selects booting into developer mode. Apparently waiting 30s does the same thing. The only obvious cue on the screen is to hit SPACE to return to normal-user mode (again via a wipe and reinstall). We of course hit Ctrl-D.
Ctrl-Alt-F2 (third key from left on top row, a right-arrow) pops from the very first screen to a “VT2 shell” at login. User “chronos” gets us in without a password. Verbiage at mrchromebox indicates there’s no other way to have sudo actually get you root - there’s a note that the “second way” to get a root-capable shell (via crosh, Ctrl-Alt-T) lost sudo capability at ChromeOS R117 and IDK if this machine is past that watershed or not.
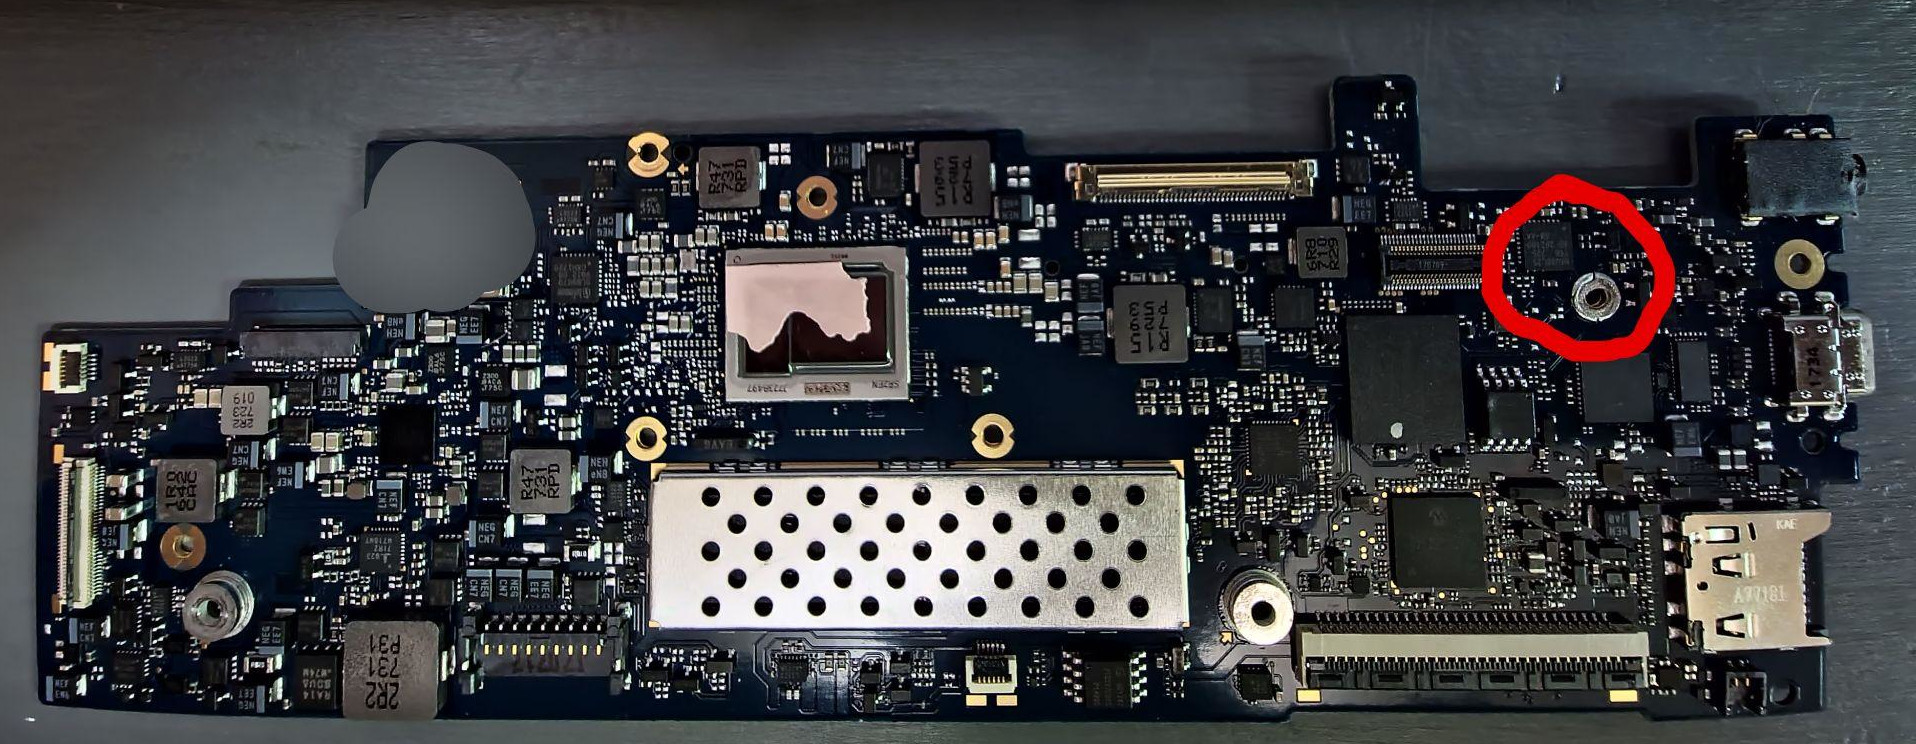
… involves removing a screw. Cool, they give a pic of the board so you know which screw - but here the screw is run into a heatsink from the other side! This requires surgery, and the battery is powered up. So in we go.
Battery out, a half-dozen cables disconnected (some with a cryptic ZIF latch), board unscrewed, screw removed. (Spoiler: I’m not paying enough attention.) Reassemble, run Mr. Chromebox’s firmware-util.sh, see “WP Enabled” - nothing can be done. After a few more tries (isolating the screw hole from the heatsink with tape, removing the heatsink altogether) I wrote to Mr. Chromebox himself and got back a nice note indicating Yes, WP is just the one screw, there’s a pull-up resistor on the flash chip so no worries about capacitance, and that he’s seen solder blobs keeping it grounded.
Looking closer, I see the same mesh washer over the screw hole that I saw in the online picture. I assumed it is meant to be there after removing the screw, but in fact it serves to ensure one of the four quadrant solder blobs around the hole (which is soldered to the screw’s through-hole via) is electrically connected to the other three - all of which go (through a SMD component, presumably a resistor) to the flash chip or its controller. Pulling the mesh washer off opened the ground connection and solved the problem: WP is no longer enabled at the hardware level.
The rest of the full UEFI firmware install process was straightforward. Booted past the Dev Mode scary screen with Ctrl-D to the login screen, then Ctrl-Alt-(third top-row key from the left) gets to a shell, login without password as “chronos”, run MrChromebox’s util with “curl -LOfk https://mrchromebox.tech/firmware-util.sh && sudo bash ./firmware-util.sh”. And follow instructions. I made a backup of the old firmware, then immediately and unintentionally destroyed it - but this was a one-way trip all along. (Glad I didn’t have trouble half-way through; wish I still had the backup in case something comes up in the future.)
Initial install was Ubuntu 25.10. More on that later.
]]>